
iTunes is a software developed by Apple. It was created in order to add, organize, and play your digital media files. Plus, it can be used to sync this collection to your mobile device too. It’s actually a jukebox player that’s similar to Windows Media Player in Windows.
If you use this media player, you may want to know how to remove duplicates in iTunes. In this way, you can get those annoying extra copies out of the way. And, you can even free up more storage space within your computer. This will allow you to use the free space for files that are more important. Or, you can use it for other media files you want.
This article will discuss how to remove duplicates in iTunes easily. Removing them will help you make sure you have only one copy of a media file. In addition, our methods will help you free up the storage space you need for other important files.
Part 1. How Do I Check For Duplicates in iTunes?
There are steps you can implement on how to remove duplicates in iTunes. However, before that, you should be able to check the duplicates within iTunes. You should find them before you remove them manually or automatically.
So, here are the steps to find a file within your computer’s iTunes Library or within a particular playlist:
- Go To iTunes App And Its Search Field. Open your iTunes app on your computer. After that, click the Search field located in the top-right part of the interface. Then, type out the specific criteria you wish to locate.
- Choose Where And What You Want To Look For. Once you are typing within the search bar, iTunes will then show up a list based on what you are typing. Now, you can choose the place where you want the platform to search. You can do this by clicking “All Apple Music” or “Library”. The former is only possible if you have subscribed to Apple Music.
- (Optional) Search For Various Song Comments. Another thing you can do is to search for comments within the song. To search for this one, ensure that the column for Comments is displayed. Then, select View and then choose Show View Options.
- Enter And Check Search Results. Now, the next step will be to press the Enter key. Then, the search results will be displayed within the interface of iTunes. Now, check out the file you are looking for. Check out if it has duplicates.
- (Optional) Display All Items You Have Again. After you have searched for your file, you may want to display all the items within iTunes again. To do this, simply delete the text you have typed out within the search field. Another thing you can do is to press the key for Escape. You can also click the X button on the search field to delete the text within it immediately.
IMPORTANT: It is important to note that you can’t look for radio listings. This is not possible within the iTunes interface.
Within your iTunes library, you can also find every song created by the same artist. For instance, one song may appear within the album of the artist. And, it may also appear within the soundtrack of a movie.
Exact duplicates can also be searched for. For instance, a song, album, artist, and even version may be identical for one item. This may be true in cases where you have uploaded a particular file twice by mistake. You should also be able to know that finding duplicates is not limited to songs alone. You can also know how to remove duplicates in iTunes (or locate them) even if they are audiobooks, TV shows, movies, etc.
So, here the steps to find duplicates which are necessary on how to remove duplicates in iTunes:
- Launch iTunes And Choose A Specific Option. First, you have to launch the iTunes application within your computer. Select a specific option (e.g., Movies, Music, Audiobooks, etc.) within the left. There’s a pop-up menu there where you can find these options. After that, choose the tab labeled Library.
- Choose A Specific Item. Choose a particular item, then you can implement any of the following:
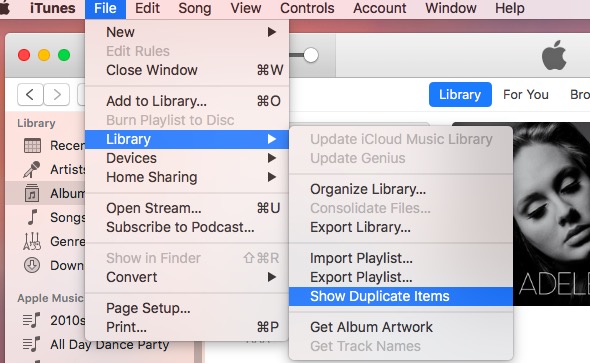
- How To Find All Instances Of That Particular File Within Your Library. To do this, you can select File and then choose Library. After that click the option to “Show Duplicate Items”.
- How To Locate Exact Duplicate Files. Hold the Shift key down. After that, click the option for File and then choose Library. Then, choose the option labeled Show Exact Duplicate Items.
- Delete Duplicate Items. The next thing you should do is to declutter the library by deleting these duplicate items. If you want to check out all items within your Library again, you should click the option labeled “Done”. This is located in the upper right corner. Or, another thing you can do is to click File and then choose Library. After that, click the option for Show All Items.
How To Remove iTunes Duplicates On Mac Manually?
So, how to remove duplicates in iTunes on Mac through the manual method? Of course, this method will be very tedious as you have to select the actual files that are duplicates of the original ones. Thus, you need to have patience on how to remove duplicates in iTunes manually.
Here are the steps you should do in order to implement how to remove duplicates in iTunes manually:
- Locate The Duplicate Files. The first thing is to follow the steps above in order to locate the duplicate files within your system. This is a prerequisite on how to remove duplicates in iTunes.
- Select The Duplicate Items. Then, the next step, after the search results are shown, is to choose the duplicate items within the interface of iTunes. You can select multiple items by holding down the key for Command and then pressing the items you wish to select.
- Press Delete. The next step would be to press the Delete key within your keyboard. Then, you’d have to click the option to Delete Song (or whatever item you’re trying to delete).
- Empty Trash. Finally, go to your Trash in order to empty it. This will allow you to finish the process on how to remove duplicates in iTunes.

Part 2. Fast Way To Mass Delete Duplicates In iTunes?
There’s a faster way on how to remove duplicates in iTunes. This will involve PowerMyMac and the use of its Duplicate Finder. The said tool can help you optimize your Mac computer by removing unnecessary files, including duplicates.
Here are the steps on how to use it:
Step 01. Download, Install And Launch The Software
The first thing you should do is to download PowerMyMac from its official website. You can simply grab it on the Internet. You can get the free trial or go for the purchase outright. Then, once you have grabbed the installation file, you should open it. Follow the instructions on the screen to install PowerMyMac. Then, open the software on your computer.
Step 02. Select Duplicate Finder and Scan Duplicates
Once PowerMyMac is launched, the next step you should do is to choose Duplicate Finder. This is located on the left side of the screen. Then, press the Scan button located at the lower central portion of the interface. This will help on how to remove duplicates in iTunes by finding the duplicate files.

Step 03. Select Files To Remove
The next step on how to remove duplicates in iTunes is to select the different files that are duplicates. You can check each file and preview its information to make sure it is a duplicate.
Step 04. Clean iTune Duplicates
The last step on how to remove duplicates in iTunes automatically is to click the Clean button. This will remove the duplicate files you have selected. Wait until the process is complete. PowerMyMac will tell you that the cleanup is already completed.

Now, those are the steps on how to remove duplicates in iTunes using PowerMyMac. You will notice that this is easier compared to the manual way of doing so. This is because you don’t have to check each file one by one and delete them one by one.
Part 3. Useful Tips For Removing Duplicates In iTunes
Now, we will give you useful tips on how to remove duplicates in iTunes. These tips will help you locate and check out these duplicate files and remove them if you want to. It will help free up more storage space within your computer.
What Should I Do When Duplicate Items Are Greyed Out Within iTunes?
So, you may want to know how to remove duplicates in iTunes. However, some of the items are greyed out. Do you want to know why this is the case? Actually, there are different reasons why your items are greyed out in the interface of iTunes. Check them out below.
- One of the reasons why is the feature for Show Duplicate Items is applicable only to that of iTunes Music. In addition, the iTunes software has various libraries for various types of media including TV Shows, Audiobooks, Movies, and Music. In order to make sure this issue is fixed and to be able to implement how to remove duplicates in iTunes, you should make sure you open the library of that media type.
- In addition, this feature has support only for the computer’s Music Library. This will not support libraries from a portable or mobile device such as an iPhone, iPod, or iPad.
Why Does iTunes Create Duplicates All The Time? How Do I Stop This?
So, there are times when iTunes create duplicates of files you have already in your system. So, how do you stop this from happening?
- This usually happens when you copy a folder (for music) to that of iTunes manually. Thus, iTunes will immediately create a duplicate of files that are already in the system. So, one thing you can do, which is very easy, is to copy this folder that contains music to the library of iTunes. In this way, you won’t create duplicates. In addition, iTunes will immediately add the new files without making duplicates.
- Another thing you can do is to modify the settings within iTunes. You should change the settings so that it imports music automatically without causing duplicates. To do this, you have to launch iTunes first. Then, choose the option for iTunes and then click Preferences. The next thing you should do is to click the tab labeled Advanced. Then, uncheck the box that says Copy Files To iTunes Media Folder When Adding To Library. This phrase is located right next to that box.
- Another thing preventing the issue of how to remove duplicates in iTunes is by storing your files within the media folder of iTunes by default. So, if you’re going to grab music from the Internet, you can save them to the iTunes folder immediately so you don’t get multiple copies.
- One way to prevent the issue how to remove duplicates in iTunes is to avoid transferring the music you have purchased (on your iOS device) to that of the iTunes platform on your Mac.
There Are Other Duplicate Songs On My iPhone That’s Not In iTunes? What Should I Do With It?
Another problem you may have is that the song is listed on your iPhone twice. However, once you see it on iTunes, it’s listed only once. Here are the things you should do in order to fix the problem.
- First of all, you should connect the iPhone to a Mac computer using the cable that comes with it. Make sure iTunes is installed within that Mac computer. Then, after that, you should back your iPhone up. An alternative option will be to back it up using iCloud. After that, eject your iPhone from iTunes.
- The next step is to use your iPhone and go to the Settings app. Then, click General and then click Usage. Go to the option labeled Storage and click Music. Click the option for Edit and then press Delete.
- After that, restart the iPhone by closing it and opening it up again. Then, connect it to iTunes on your Mac computer. Finally, you can simply sync your iTunes media files manually.


