
In the past, the site has been strongly marketed utilizing techniques that MacRumors terms of inaccurate statements. When you enabled the MacKeeper provides a variety of resources to help support your Mac going perfectly. But Malwarebytes and spyware also saw it as a possibly unsafe application, a type of malware.
How to remove MacKeeper? But whatever the purpose, several computer users who still have MacKeeper enabled feel they really want to delete it. That being said, its extraction is a procedure that may require a variety of actions. MacKeeper puts data in many directories on the Mac, causing it much more complicated to delete the program on your computer. Fortunately, we're going to teach you how to remove it easily and quickly.

Part 1. Should I Uninstall MacKeeper?
Imagine that you're installing an application from the approved firm's page, attempting to access it and immediately see the warning that the software is possibly unsafe or undesirable. Many protection platform providers will not specify what they deem to be "possibly unacceptable" to their clients, causing more uncertainty.
MacKeeper, a virus protection program for Macs, inadvertently leaked the data of more than 13 million active users, as per a study. The data contained addresses, mobile numbers, passwords, email addresses, and much more, but it found by the security consultant, who pointed MacKeeper to the organization. (MacKeeper, though, maintains that no sensitive data have been released and says that the knowledge has been stored.)
Throughout the past, MacKeeper was reported to have been involved also with controversial "Your Mac is infected" posts. While the organization disassociated itself against such strategies, MacKeeper's protection reputation continues to be controversial. Malwarebytes, or particularly deems MacKeeper to be a "potentially unwanted software" or a PUP. But on the other side, as per MacKeeper's homepage, which has its own malware detection research facility which investigates fresh and disapproved state concerning the computer.
There are reports concerning MacKeeper all across the shop it's a virus. It keeps the computer hostage before you pay for it. It can not be absolutely deleted until you wish to uninstall it. It bugs down rather than accelerating up your system. It removes the hard disk, deletes images, and drops records. There is an outcry over MacKeeper's entry fee rates. Zeobit has been criticized for sketchy publicity strategies. It operates throw-under advertisements, plants shoe-doll ratings, and promotes seedy partner pages, experts claim.
Even though nobody can ensure that your Mac will still be absolutely protected against infections and other threats, odds are reasonably decent that if you're diligent and also don't drop for fraud schemes, your Mac truly can't be compromised. There are a number of companies that are forcing unaware users to update or purchase applications and services that have already been confirmed to be of dubious value. These direct campaign tactics take effect in several forms, particularly on computers.
Even if you and anyone you recognize was already fooled by registering for a MacKeeper monthly or yearly access charge, you could close your account and also refund the money by taking out this application upon the authorized MacKeeper webpage. When you're in question about whether MacKeeper is safe to be used on your Mac, then you can find several of its generally known substitutes.
Part 2. How to Uninstall MacKeeper on Mac?
Previous iterations of MacKeeper had a history of being complicated to remove, however deleting more updated versions is a quick method. When you delete an earlier version (prior to the actual version) we give some suggestions too though.
Your MacKeeper software helps to secure the Mac from threats and help the device function smoother. Ok, which sounds wonderful. Fortunately, the service is also noted for its highly negative advertisement campaign, rendering irritating advertisements anywhere and way too much. If you are one among the individuals who are enabled to use the MacKeeper and then want to delete it, try this guide and know how to do everything. Here's how to remove MacKeeper. Follow the steps and guidelines below.
There are many specific measures you will need to fully uninstall the MacKeeper from your Mac. Here are the following:
- Remove MacKeeper from the toolbar
- Remove the application
- Delete the files that are left behind
- Delete plugins to window and cookies
Now we're going to explain each move in-depth to make things easier on how to save the Mac from MacKeeper.
How to Uninstall MacKeeper App?
Just simply, Click on the start menu that indicates a few of the directions wherein MacKeeper allows the impossible to delete or even stop running the application. And there is no Quit control there too. So we don't have to just Stop yet. You have to uninstall MacKeeper to your App start menu.
- Go over the Application folder and double-click the MacKeeper to activate it.
- Click the MacKeeper application located on the left side of the list panel and click Preferences.
- Choose one in the General category.
- Unmark the View MacKeeper symbol panel in the start menu.
- Quit on the MacKeeper. And Ignore any reminders to toggle it on or sign up for certain programs.
Or do the following.
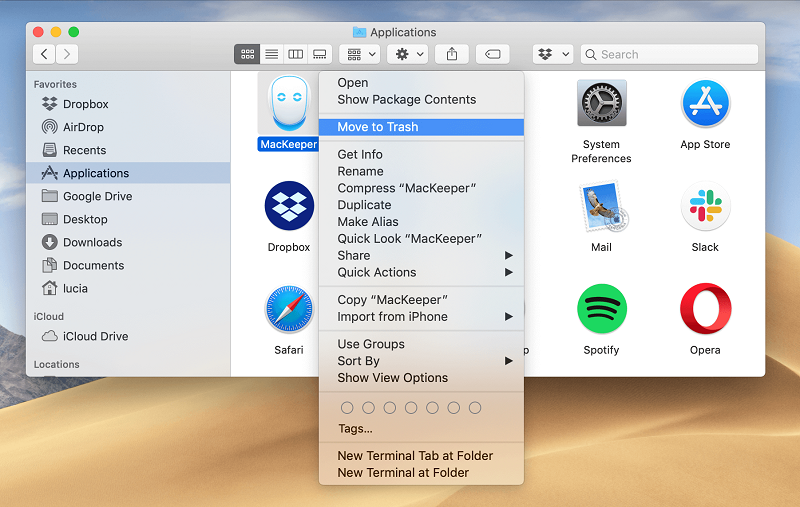
- Go to the Finder application located on the dock of Programs.
- Activate MacKeeper and leave this with a CMD + Q keyboard shortcut.
- Move MacKeeper to the Bin or right-click it and pick Move to Trash.
- And type the password of the administrator repeatedly while you are prompted to validate your removal.
MacKeeper is a complicated program that has generated a number of active files and data. If you search the Library directory, you will notice some unknown MacKeeper-related service documents which were on the Mac. So, to delete MacKeeper absolutely, adopt all these measures.
How to Delete MacKeeper Leftover Files?
- Launch your Finder
- Select go over to Folder in the navigation panel.
- Type in the ~/ Library/search box and press Go.
- Search and erase all files and data which have MacKeeper throughout their terms within the Library folder. These are mainly contained in the below subfolders.
- ~/Library/Application Support
- ~/Library/Caches
- ~/Library/LaunchAgents
- ~/Library/LaunchDaemons
- ~/Library/Preferences
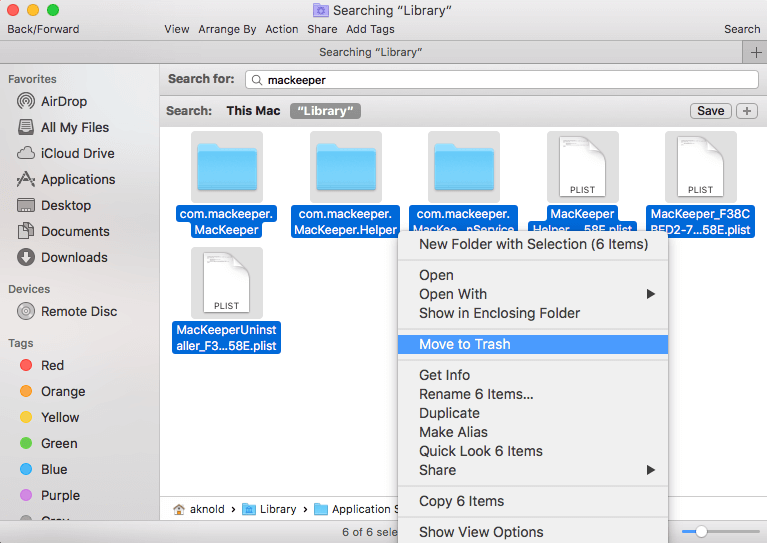
And you’re all done now, to successfully know how to remove MacKeeper on Mac manually.
Ensure that you should have administrator access to your computer and that you understand the Mac admin keys. Test your edition or version of MacKeeper. Launch the application properly, and then click on the MacKeeper within the top left-hand corner, and then choose About MacKeeper. Make your data secure. Note on this before deleting the MacKeeper on your device.
Software Encryption Files cannot be reached without MacKeeper, decrypted until deleting the program. Data backup created with the Backup option keep on your computer and can be restored again after MacKeeper has been uninstalled.
How to Remove MacKeeper from Safari?
When you installed MacKeeper "legitimately" from MacKeeper.com you would not see a load of pop-up and pop-up advertising on your screen. However, if you decide to pick up the MacKeeper by installing the application from a third-party repository, the windows may be corrupted with the malicious advertisements that annoy you to update MacKeeper and literally won't let you do something else. It's the toughest thing. Still, you will get it to go down.
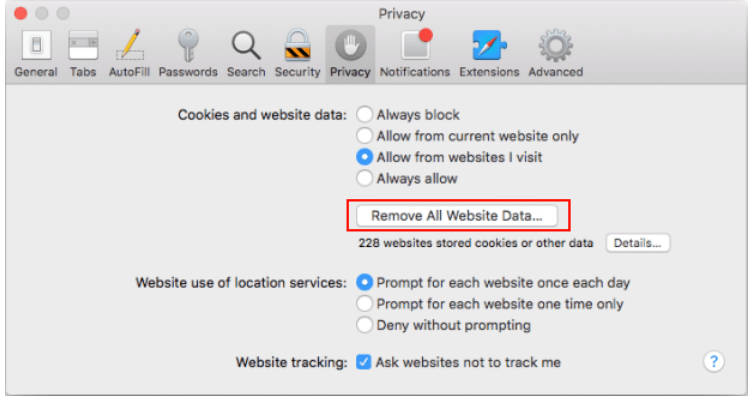
- ln the Safari browser, which includes the launching of the Safari Preferences, select the Privacy section and afterward hit the Manage Website Data key.
- Check for the MacKeeper on the panel that appears, and there's a high chance that you'll find a file for mackeeper.com.
- Pick it and then click the Delete key. You're never going to use the web anyway.
That’s it you’re done on how to remove MacKeeper in the Safari browser.
How to Remove MacKeeper from Chrome?
- Launch your preferences in Chrome and then click on the "Show advanced settings" icon located in the Settings pane.
- Select the Content Settings key in the Privacy section, and click the All Cookies and Web Data key in the browser that shows.
- To check for a MacKeeper, just use the search field in the corresponding browser. Select the Remove All tab.
And that’s it you’re done again on how to remove MacKeeper in the Chrome browser. There's still a lot of this stuff around nowadays, though others are more advanced than most of those. One version can offer you a few restrictions at all and avoid everything that looks like a banner-ads, pop-ups, images, and so forth. The trouble with any of these is that they will pull out both positive and poor stuff. Often, by utilizing those large strokes, they avoid less invasive advertising that support websites remain in operation.
Instead, we advise you to use a reliable tool that will avoid the very weird crap advertisement or to auto-update the files. That way, you can promote the destinations you want and at the same time, it will keep out the things which might keep you from accessing the page once. The PowerMyMac application also enabled the actions on this issue, keeping your Mac more manageable and clean from advertisement and pop-ups.
Part 3. Best Tool to Remove MacKeeper from Mac
PowerMyMac Uninstaller is a great application that can greatly assist you to uninstall the MacKeeper quickly which will contain all of the documents that are connected with the application as well. All you have to do is to select a couple of clicks and you're done. Here’s how to remove MacKeeper easily.
Step 1. Download and install the PowerMyMac application on your device from the official website.
Step 2. Launching the application.
Once you have effectively enabled the PowerMyMac onto your Mac, head over and begin to launch the application on your device. And on the PowerMyMac key dashboard, you'll be enabled to see all the progress of the Mac device.
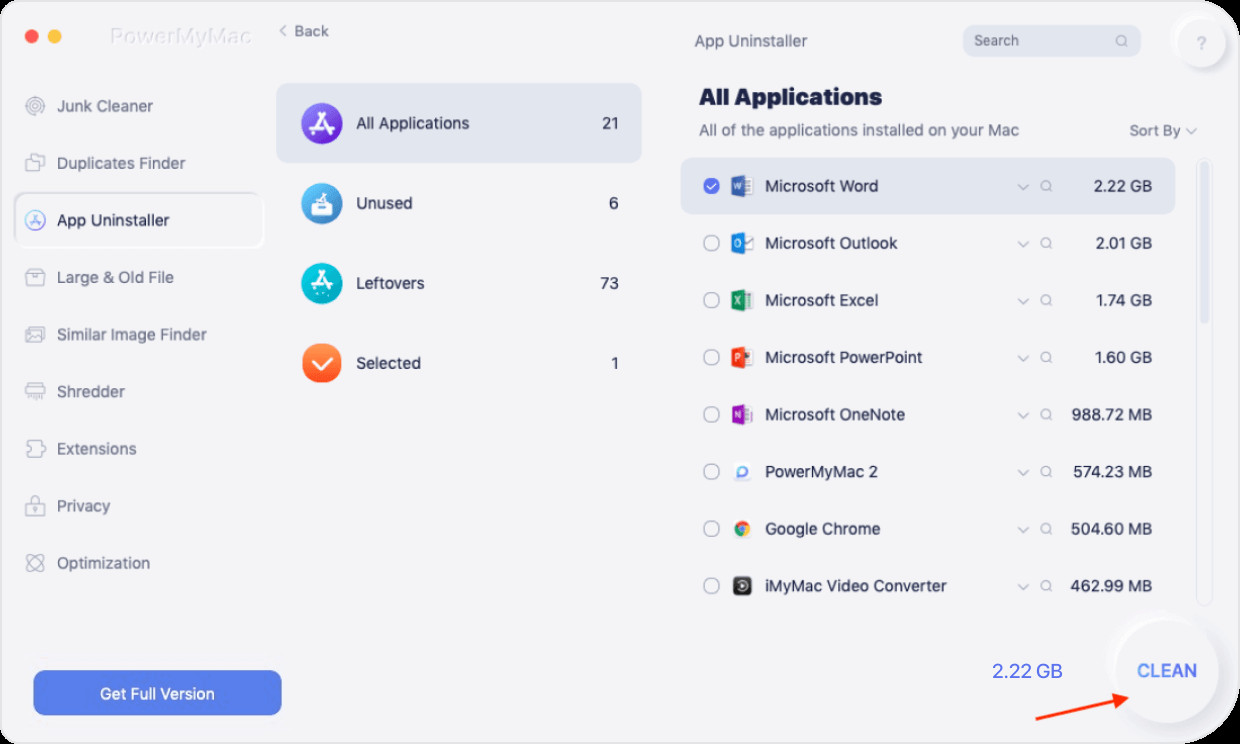
Step 3. Select the Uninstaller module.
From the list of items, pick the Uninstaller feature.

Step 4. Scan the Apps.

Step 5. View and select the Application
When the scan step is finished, you may now review all of the programs that the process has screened.
Step 6. Find and Choose a MacKeeper.
Click on the application, It will display you all of the resources which are connected to the MacKeeper located on the right corner of your computer.
Step 7. Select all Files for Cleaning.
On the list of files and data, move and then pick all of the files. Select to delete it from your device. You could pick everything by clicking on the small bubble behind the file, or you could just hit "Select All" just at the top corner of the screen.
Step 9. Clean MacKeeper
Now you can click on the Clean button and start how to remove MacKeeper on your device. Wait until it finish the process and you’re all done.
As you can see, PowerMyMac has a lot of features that will allow you on how to uninstall apps on Mac. Plus, other modules enable you to optimize your computer to free up more storage space and make it perform to its maximum potential.
That’s it you now know how to remove MacKeeper on your device completely.
Part 4. Conclusion
If you adopt the measures mentioned above, MacKeeper is probably gone and all of the MacKeeper's data will be completely gone on your device. But one item that could be there is the empty folders, but, they will immediately be deleted when you reset or restart your Device.
You can Make sure that the MacKeeper won't leave anything on your computer. And it is completely removed on your device now. Also using a reliable tool like the PowerMyMac application, you can easily do the uninstalling without any hassle.


